Madison, WI 53705, U.S.A.
Phone: (608) 238-2171, Fax: (608) 238-9241
Email: info@powline.com
| Home | Search | News | Products |

|
610 N. Whitney Way, Suite 160
Madison, WI 53705, U.S.A. Phone: (608) 238-2171, Fax: (608) 238-9241 Email: info@powline.com |
|||
|
A powerful new feature has recently been added to PLS-CADD. The name of it – Automatic Pole Selector – doesn’t even begin to describe the full usefulness of this feature. For that, we have this TechNote.

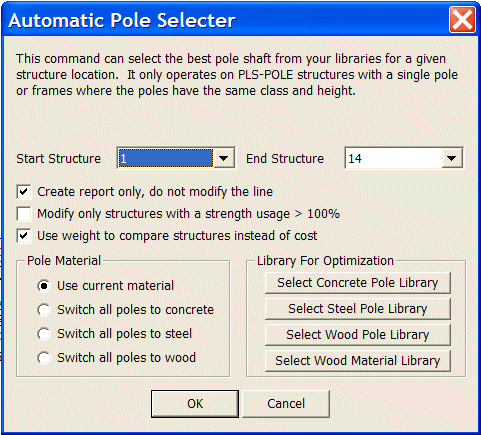
The Automatic Pole Selector can look at all the poles in your line and automatically replace any failing ones with stronger poles or replace over designed poles with less expensive ones. This function can not only analyze the existing material, but also check a replacement material as well. For example, if you’ve got a wood structure line that you are reconductoring, you can use the Sections / Table function to quickly replace all of your conductors and then use the automatic pole selector to automatically replace all failing wood poles with the least expensive steel poles available in your steel pole list. This feature is also extremely useful for distribution lines when a foreign company desires to add communication cables. After adding the communications cables you run the automatic pole selector to generate a list of which poles are failing and the least expensive poles that can be substituted. To see a step-by-step description of how to do this, please read on.
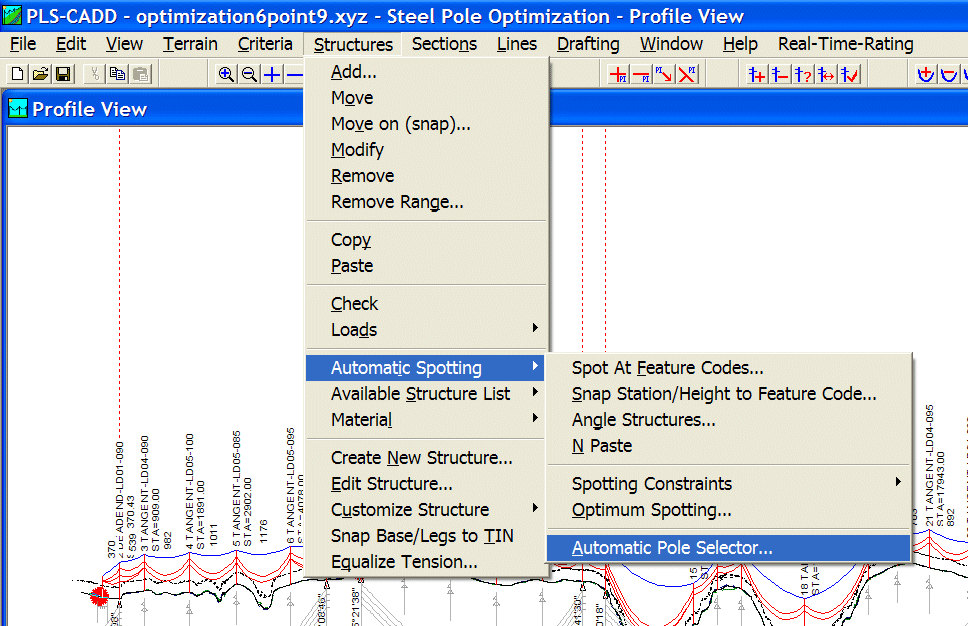
The Automatic Pole Selector can be found under Structures / Automatic Spotting / Automatic Pole Selector. If you do not have the Optimum Spotting option in PLS-CADD, you will not have access to this feature. Additionally, to use this feature, you will need to have modeled your structures in PLS-POLE. Once you have your structures modeled in PLS-POLE and spotted in your PLS-CADD line design, you are ready to begin.

That’s it! For most lines, you should be able to develop a full pole replacement program quicker than it takes to get a cup of coffee. As you can imagine, there are many situations where this feature can be used to save you a lot of time. In fact, the ability to quickly make these change outs and pole selection optimizations enables you to evaluate many more scenarios than you might otherwise. In addition to those described in the introduction above, you can use the Automatic Pole Selector for new lines where pole placements are predetermined; just place poles of the desired heights wherever you want the poles to go, without regard to their size. Then, run the Automatic Pole Selector with the option to only replace poles above 100% usage turned off, and the optimized pole for all locations will be selected. This is particularly beneficial in distribution and urban environments.
Below are a couple of reports in PDF format that you can download and examine to see the Automatic Pole Selector in action.
One last word of advice; when you pick a Pole Library in Step 7 above, any pole that is in the library that has the same length as the current pole will be evaluated. You may wish to go through your Pole Library and delete any poles that you do not wish to be considered for your optimization. You may wish to use the Save As function when doing this, and save out a separate "optimization library" so that your standard library of all possible available poles is not affected.
In closing, the Automatic Pole Selector is a very powerful feature that will probably pay for itself the first time you use it.