Madison, WI 53705, U.S.A.
Phone: (608) 238-2171, Fax: (608) 238-9241
Email: info@powline.com
| Home | Search | News | Products |
|
|
610 N. Whitney Way, Suite 160
Madison, WI 53705, U.S.A. Phone: (608) 238-2171, Fax: (608) 238-9241 Email: info@powline.com |
|||
|
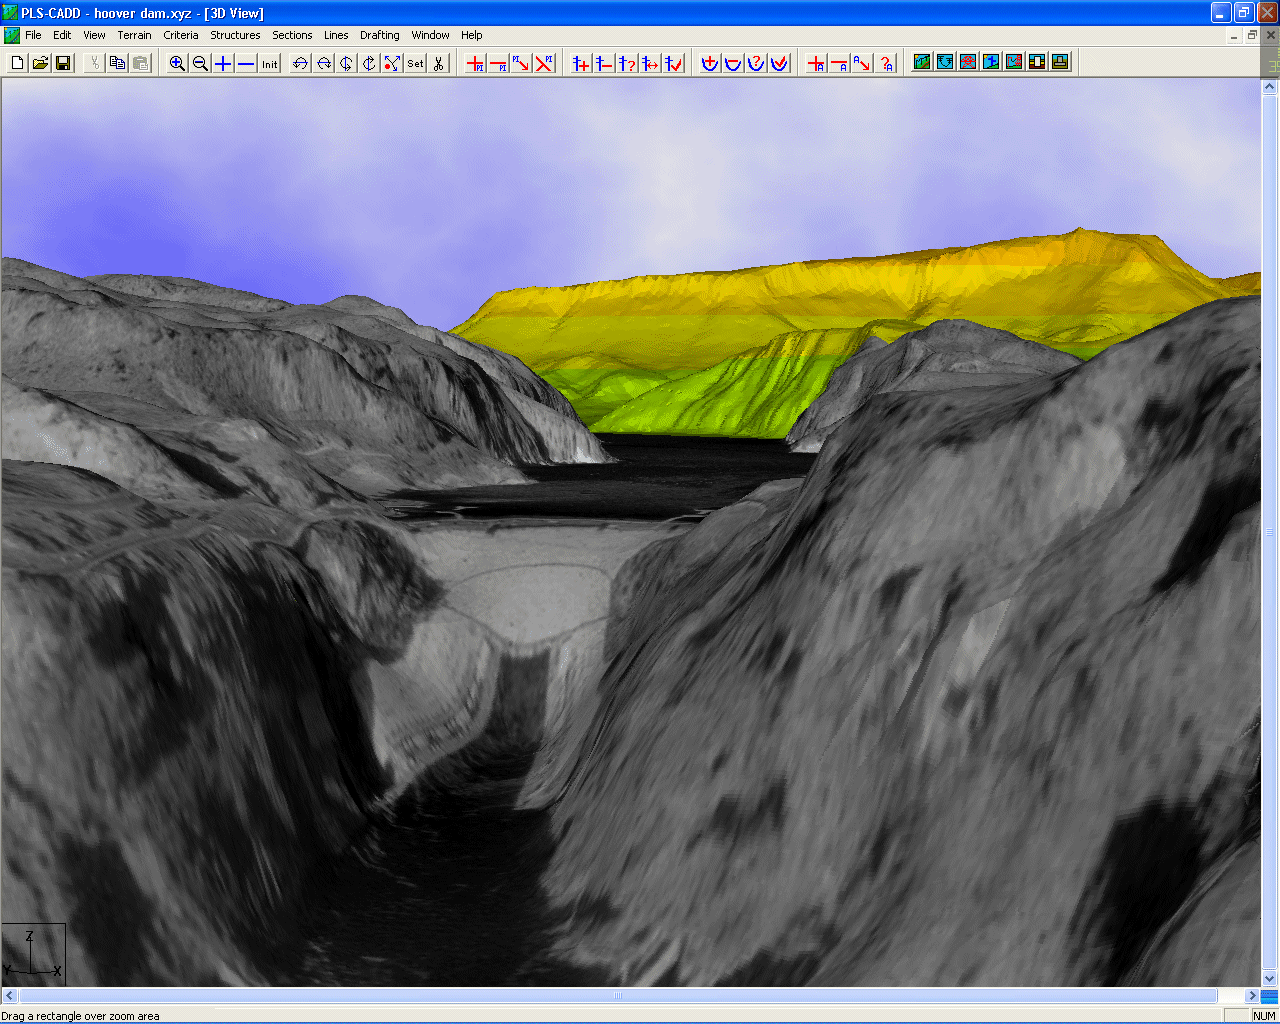 For more than a decade PLS-CADD has been able to use data from many sources and in many formats.
Traditional survey data can be manually typed in point by point.
Electronic survey data from field data collectors to USGS DEM data to NED data to LiDAR data can be electronically imported into PLS-CADD.
Basemaps in numerous formats such as USGS quad maps, USGS DOQQs, traditional aerial photography, survey maps, property maps, and geodata from GIS programs such as ESRI's ArcView, GE's Smallworld, MapInfo, and others can be referenced by PLS-CADD. This assists not only routing and staking operations within PLS-CADD, but also provides complete Plan & Profile drawings with all available information published on these drawings.
Other TechNotes (hyperlinked below) demonstrate how all of this can be done and how useful this information is to today's transmission and distribution engineers and technicians.
For more than a decade PLS-CADD has been able to use data from many sources and in many formats.
Traditional survey data can be manually typed in point by point.
Electronic survey data from field data collectors to USGS DEM data to NED data to LiDAR data can be electronically imported into PLS-CADD.
Basemaps in numerous formats such as USGS quad maps, USGS DOQQs, traditional aerial photography, survey maps, property maps, and geodata from GIS programs such as ESRI's ArcView, GE's Smallworld, MapInfo, and others can be referenced by PLS-CADD. This assists not only routing and staking operations within PLS-CADD, but also provides complete Plan & Profile drawings with all available information published on these drawings.
Other TechNotes (hyperlinked below) demonstrate how all of this can be done and how useful this information is to today's transmission and distribution engineers and technicians.
Importing all of these maps and data into a project would be a no-brainer if Galileo had been wrong or if Columbus would have fallen off the edge of the earth. However, they were both right, and unfortunately for us in a geographic related industry the earth is not flat. Measuring and locating data on a sphere is easy, but becomes difficult on the earth for one major reason; the earth is not all at one elevation. Additionally, drawing a map on a piece of paper requires a method of folding out the parts of the sphere to make it flat. How these flat elements are derived from a sphere, namely the Earth, are called projections. It is not the purpose of this TechNote to delve into the details of this, but there are plenty of other resources out there on this subject. One source that we would recommend if you are interested in these theories is "Excerpts From: Map Projections A Working Manual", by John P. Snyder.
If the original cartographers of the world would have gotten together and developed a standard projection before the first map was created our lives would be easier. But they didn't. Also, various projections work better for different ways of presenting cartographic information. As a result of all of this, there are literally hundreds of different ways to fold out a sphere into a flat document. To add to the complexity, once the sphere is “flattened”, some of these projections are broken up into zones and regions, and for those of us here in the U.S., each state has its own “0,0,0” origin, with many states having 2 or 3 of these regions, and a few states having more than that (Alaska has 10 zones). To make the situation even more complicated, in the U.S., some states use the NAD27 projection, others use the NAD83 projection, and some are in the process of migrating from the NAD27 to the NAD83. As you can imagine, there are hundreds, if not thousands of projections and coordinates systems used all around the world where PLS-CADD is used. Sound confusing? It is.
Thus the purpose of this TechNote: to provide some direction for PLS-CADD users who would prefer to belong to the Flat Earth Society, but who must design lines in the real world.
First of all, you should decide what projection and coordinate system you want to do all of your work in PLS-CADD. Most utilities have already identified this. If you haven't, you should discuss this with your surveying department or a knowledgeable surveyor in your territory. It should be noted here that some utilities have territories that may span across several coordinate systems. Some of these utilities may use the different systems for each of their lines or segments thereof. Others have chosen their primary coordinate system and extend that into their other regions. Once you determine what projection and coordinate system you want to use for your project, we strongly suggest that you require all information be provided in this system. In a perfect world, you would be able to obtain all of the information in your project system. But you will inevitably receive information in different projections and coordinate systems and we need to be able to process that information to make it usable.
The good news in all of this is that it is possible to convert, or reproject as some call it, data and maps from one projection and coordinate system to another. If you know the proper shifting, scaling, and rotations required to go from one system to another, you can do this inside of PLS-CADD by pressing the F1 key, selecting Survey/Terrain Features/Shift, Scale, Rotate XYZ Coordinate System and by specifying each of the X, Y, and Z shifts, scales, and rotations, you can reproject from one system to another. The difficult part is determining what the appropriate factors are. You may be able to obtain them by consulting with your local GIS expert. Also, there is a wealth of information on the Internet regarding these transformations. If you can obtain these values, you can reproject your project from one projection and coordinate system to another.
Since these values can be difficult to calculate and you may in fact have data from a variety of sources all in different formats using different projections, we recommend that you reproject all of this data BEFORE importing it into PLS-CADD. If your data is already in one of the major GIS programs you should be able to reproject it into your project coordinate system directly from that program. However, sometimes the data may not be in your GIS program, the GIS software may be too hard to use or you don't have a GIS program at all. Whatever the case, there are literally hundreds of freeware, shareware, and commercially available programs out there that can assist you in this effort. While many of these programs are good we recommend Global Mapper. This program not only does projection merging and reprojection, it can directly open a whole host of file formats including USGS SDTS DEM and SDTS DLG, USGS DRG and DOQQ, Shapefile, NED, GOTOPO30, GeoTIFF, MrSID, and a number of others listed on their website. And if the files are georeferenced (most publicly available data is), the georeferencing information will be read as well. On the rare occasions where the georeferencing isn't automatically detected, you may need to ask your data provider for this information and manually select the projection and coordinate system for that data set. Once you have loaded your data, you can then simply choose whatever projection and coordinate system you want, and then export the data points, vector drawings, and georeferenced images ready for immediate use in PLS-CADD. The result will be that all of your data from multiple projections and coordinate systems in different file formats are all available in PLS-CADD in your selected project coordinate system and projection. You can obtain a trial version of Global Mapper from their web site if you want to see how this works. Note that Global Mapper will export to an open non-proprietary format so that other applications in addition to PLS-CADD can work with the data. Not all projection and coordinate system software plays as nicely with others.
Let's discuss how to use Global Mapper with PLS-CADD for a specific project example:
You are charged with determining multiple route alternatives for a transmission line design. The only known requirements are the beginning and end points. You can go to Geo Community and obtain for free, at a minimum, the DRGs and DEMs for your possible line routes. You might also find other information for your area of interest depending on what information has been shared by other users of Geo Community. (Note: Geo Community does provide some of this data for free but at a very slow download speed. You can pay for a Premium Membership that will allow you faster access to this free information as well as other information. Additionally, we recommend you perform a simple search on the Internet for your data as many states and regions have their own clearing houses with much of this information available for free at full download speeds.)
Once you download your data, simply open it in Global Mapper. You do not need to uncompress or untar these files as you may have to do in other programs – Global Mapper will automatically load them from their native formats. Additionally, unless you obtain this data from a rogue source, all of the georeferencing for the DRGs and DEMs should be automatic – usually in a UTM projection with a specific Zone and in Meters. You might make a note of these items in case you should get some other miscellaneous information without the projection information included. If this happens the odds are that it will be in the same projection and zone. Once you have your DRGs loaded, be sure and go to the Overlay Control Center (Tools / Control Center) and choose the Options on each DRG (you can batch pick them) and check the Auto Clip Collar – this will automatically remove the collar and provide you with seamless DRG maps. To reproject this data to your project coordinate system (usually your local State Plane Coordinate System (SPCS) for those of you here in the U.S.), go to Configuration (Tools / Configure), click on the Projection tab, and change it to your desired projection and coordinate system. Make sure you select either feet or meters to be consistent with your default settings in PLS-CADD. That's it! You are now ready to export the data for use in PLS-CADD in your project coordinate system and projection.
 You can export the DRGs as GeoTIFFs (File / Export Raster and Elevation Data / Export GeoTIFF.)
You can export the entire extents of your project as one GeoTIFF, but this is not recommended for large projects.
You may wish to click on the Export Bounds tab and set your bounds manually (note that you can just Draw a Box on the screen as one option, but we have found it easiest to just hide all the images except one of them (using the Overlay Control Center option described above) and export each DRG separately – this allows you greater control over image loading and dynamic resampling in PLS-CADD).
Note that you do not need to create a TFW file as PLS-CADD uses the internal georeferencing in a GeoTIFF if available, but you may want to go ahead and create the TFW in case you want to import these images into another program that doesn't support the internal georeferencing.
You can export the DEMs as XYZ Grid files (File / Export Raster and Elevation Data / Export XYZ Grid).
For the DEMs, we recommend that you just export all of them as one file, and then use the filtering options during import in PLS-CADD to pull in the points required along your corridors if you do not have sufficient RAM to simply pull in all of the points.
While it is extremely easy to set up the import of this default XYZ grid file into PLS-CADD, we provide an IMP file
here for your convenience.
Note that if you want to reference any vector drawings in PLS-CADD (i.e. Shapefiles, DLGs, DGNs, DXFs, etc.), you can use the File / Export Vector Data / Export DXF to create a DXF which can be read directly into PLS-CADD.
You can export the DRGs as GeoTIFFs (File / Export Raster and Elevation Data / Export GeoTIFF.)
You can export the entire extents of your project as one GeoTIFF, but this is not recommended for large projects.
You may wish to click on the Export Bounds tab and set your bounds manually (note that you can just Draw a Box on the screen as one option, but we have found it easiest to just hide all the images except one of them (using the Overlay Control Center option described above) and export each DRG separately – this allows you greater control over image loading and dynamic resampling in PLS-CADD).
Note that you do not need to create a TFW file as PLS-CADD uses the internal georeferencing in a GeoTIFF if available, but you may want to go ahead and create the TFW in case you want to import these images into another program that doesn't support the internal georeferencing.
You can export the DEMs as XYZ Grid files (File / Export Raster and Elevation Data / Export XYZ Grid).
For the DEMs, we recommend that you just export all of them as one file, and then use the filtering options during import in PLS-CADD to pull in the points required along your corridors if you do not have sufficient RAM to simply pull in all of the points.
While it is extremely easy to set up the import of this default XYZ grid file into PLS-CADD, we provide an IMP file
here for your convenience.
Note that if you want to reference any vector drawings in PLS-CADD (i.e. Shapefiles, DLGs, DGNs, DXFs, etc.), you can use the File / Export Vector Data / Export DXF to create a DXF which can be read directly into PLS-CADD.
You are now ready to begin laying out your preliminary line designs in PLS-CADD with this data. See our TechNote on Using USGS Data in PLS-CADD for the detailed step-by-step process as well as a corresponding video on how to do this. Using the Multiple Alignment options in PLS-CADD, you can easily select multiple routing alternatives for the various line routes, and then optimize them. This yields optimized line designs on multiple routes for the best possible cost estimate for each route.
The reason that we recommend that you reproject all of your data into your local coordinate system instead of the default UTM system is that once you have decided on your routes, you can commission a detailed survey for them. Whether that survey is by traditional methods or by LiDAR, that data can then simply be directly imported into your PLS-CADD model (assuming that you specified that your survey be done in your project coordinate system) and the USGS DEM points deleted (or deactivated) and you will instantly have your final profile along your route. If you have already ordered your structures, you can then do manual tweaks on the final line design to minimize the change order to the structure supplier. Of course if you have not ordered your structures yet, you can then reoptimize your line for the best line spotting possible.
It is also advisable to keep your project projection and coordinate system noted with your PLS-CADD project. One recommended way to document this is to go to Criteria / Notes and simply list on one of the rows the projection, datum, coordinate system, and units for future reference. By using the %Cx annotation command, where x is the row number of the projection information, you can indicate this information automatically anywhere on your drawings.
Using the techniques outlined above, you can pull virtually any data format from virtually any source and reproject it to the projection and coordinate system you want to use in PLS-CADD. This process can also be used in reverse for some applications. For example, to use the new TerraServer Import function in PLS-CADD you must provide TerraServer with the coordinates of your first and last PI in UTM projection, NAD83 Datum. Since these projections not only scale and shift, but also rotate, PLS-CADD requires the coordinates of both the beginning and ending points of the line route. Since UTM NAD83 is rarely used as a project coordinate system, you will need to determine what these coordinates are before using this feature. An easy way to do this is to simply export (File / Export) from PLS-CADD a DXF of the Plan View. Then, open up Global Mapper, open this exported DXF, and when prompted, input the projection properties that your PLS-CADD project uses. Once the plan route is loaded in Global Mapper, go to Configuration (Tools / Configure), click on the Projection tab, and change it to UTM for the projection and NAD83 for the Datum. You will need to determine your Zone – if you don't know Global Mapper indicates the longitudes for each zone and you can determine it from that. Once you have your Zone selected, make sure you select Feet or Meters for the Units based on your project settings in PLS-CADD. Once you click on OK, you will now have the entire route of your line in the desired projection for use with TerraSever. Simply zoom in to the first PI and you can query the coordinates by just putting your mouse on this point and seeing the coordinates in the lower right hand side of the status bar. You can do this again for the last PI. Once you have these coordinates identified, simply select Drafting/Attachments/TerraServer Image Download in PLS-CADD and complete the required information. Once you click OK, you will soon have the desired aerial photography for your line automatically attached. At this time, this is a free service with coverage of most of the US. For more information see http://www.terraserver-usa.com.
A short video showing how to use the TerraServer Image Download function can be found here.
In summary, the Global Mapper program makes just about any data in just about any format and any projection usable in PLS-CADD in a matter of minutes.
Other related TechNotes that you might find helpful include: